안녕하세요. 오늘은 BVH(Bounding Volume Hierarchy) 생성 방법에 대해 알아보겠습니다.
BVH는 공간을 분할하는 계층적 자료구조로, 메쉬의 폴리곤들을 클러스터링하여 AABB(축 정렬 바운딩 박스)를 미리 계산해둠으로써 물리 시뮬레이션이나 레이트레이싱에서 효율적인 필터링과 충돌 탐지를 가능하게 합니다. BVH를 자동으로 생성해주는 툴도 많고, DX12 레이트레이싱 API처럼 하드웨어적으로 지원되는 경우도 있습니다만, 공부하는 차원에서 한번 직접 만들어 보겠습니다.
BVH 구조
BVH는 이진 트리 구조니까, 노드를 정의합시다.
public class Node
{
    public Bounds bounds;
    public int startIndex;
    public int endIndex;
    public Node childA;
    public Node childB;
}
이제 메쉬에서 삼각형 정보를 뽑아냅시다.
    Vector3[] verts = mesh.vertices;
    int[] indices = mesh.triangles;
    Vector3[] normals = mesh.normals;

    // init triangles
    numTriangles = indices.Length / 3;
    triangles = new Triangle[numTriangles];
    for (int i = 0; i < numTriangles; ++i)
    {
        int indexA = indices[i * 3 + 0];
        int indexB = indices[i * 3 + 1];
        int indexC = indices[i * 3 + 2];
        triangles[i] = new Triangle(
            verts[indexA], verts[indexB], verts[indexC],
            normals[indexA], normals[indexB], normals[indexC]);
    }
이 정보를 바탕으로 트리를 구성해봅시다.
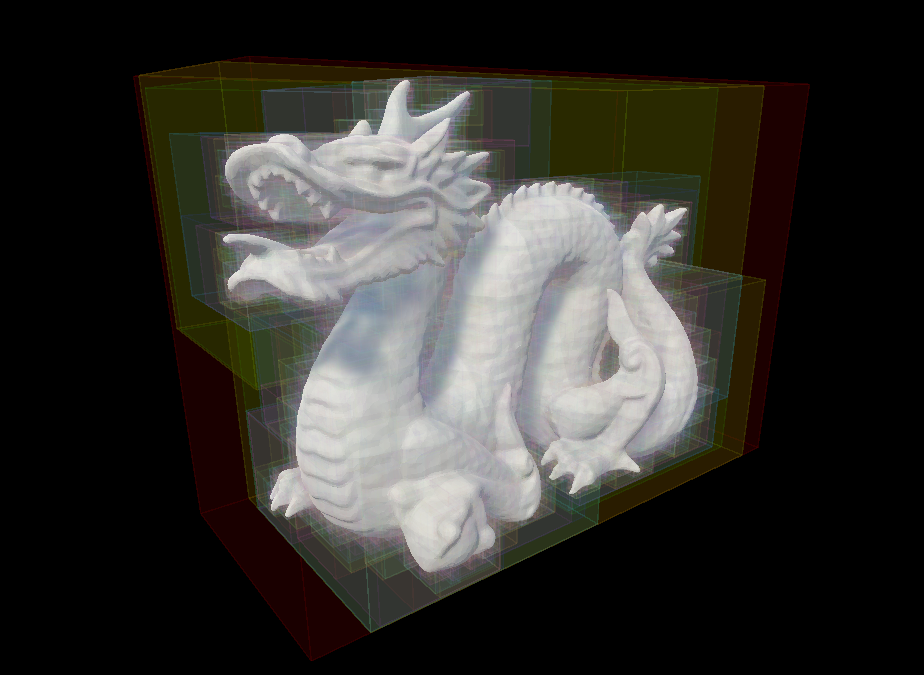
바운딩 박스를 Z축을 기준으로 반으로 쪼개면서 이진트리를 구성해줍니다.
...
// build bvh
root = new Node(mesh.bounds, 0, numTriangles);
splitRecursive(root);
...
private void splitRecursive(Node parent, int depth = 0)
{
if (depth == maxDepth) return;
// split the parent's bounding box into two sub-bounding boxes
Bounds splitBoundsA, splitBoundsB;
splitBounds(parent.bounds, out splitBoundsA, out splitBoundsB);
// reorder triangles
int indexA = parent.startIndex;
int indexB = parent.endIndex - 1;
while (indexA <= indexB)
{
Triangle triangle = triangles[indexA];
Vector3 triCenter = (triangle.vertexA + triangle.vertexB + triangle.vertexC) / 3f;
if (splitBoundsA.Contains(triCenter))
{
++indexA;
}
else
{
(triangles[indexA], triangles[indexB]) = (triangles[indexB], triangles[indexA]); // swap
--indexB;
}
}
// recalculate accurate bounds
Bounds boundsA = calcBounds(triangles, parent.startIndex, indexA);
Bounds boundsB = calcBounds(triangles, indexA, parent.endIndex);
// reculively split childres
parent.childA = new Node(boundsA, parent.startIndex, indexA);
parent.childB = new Node(boundsB, indexA, parent.endIndex);
splitRecursive(parent.childA, depth + 1);
splitRecursive(parent.childB, depth + 1);
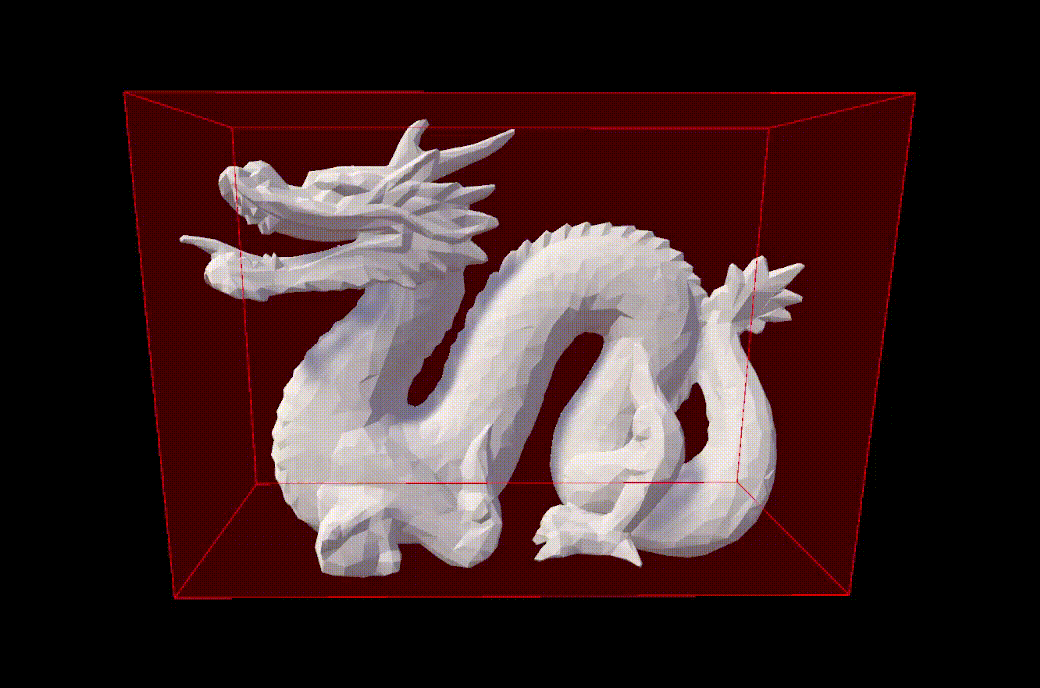
}결과를 볼까요.

잘 되긴하지만 분할하는 축이 이런식이면 안될거 같죠? 가장 긴 축을 반으로 나누는 식으로 바꿔봤습니다.
private void splitRecursive(Node parent, int depth = 0)
{
    if (depth == maxDepth) return;

    // split the bounding box in half along its longest axis
    Vector3 size = parent.bounds.size;
    int splitAxis = size.x > Mathf.Max(size.y, size.z) ? 0 : size.y > size.z ? 1 : 2;
    float splitPivot = parent.bounds.center[splitAxis];

    // reorder triangles
    int indexA = parent.startIndex;
    int indexB = parent.endIndex - 1;
    while (indexA <= indexB)
    {
        Triangle triangle = triangles[indexA];
        Vector3 triCenter = (triangle.vertexA + triangle.vertexB + triangle.vertexC) / 3f;
        if (triCenter[splitAxis] < splitPivot)
        {
            ++indexA;
        }
        else
        {
            (triangles[indexA], triangles[indexB]) = (triangles[indexB], triangles[indexA]); // swap
            --indexB;
        }
    }
    ...
}
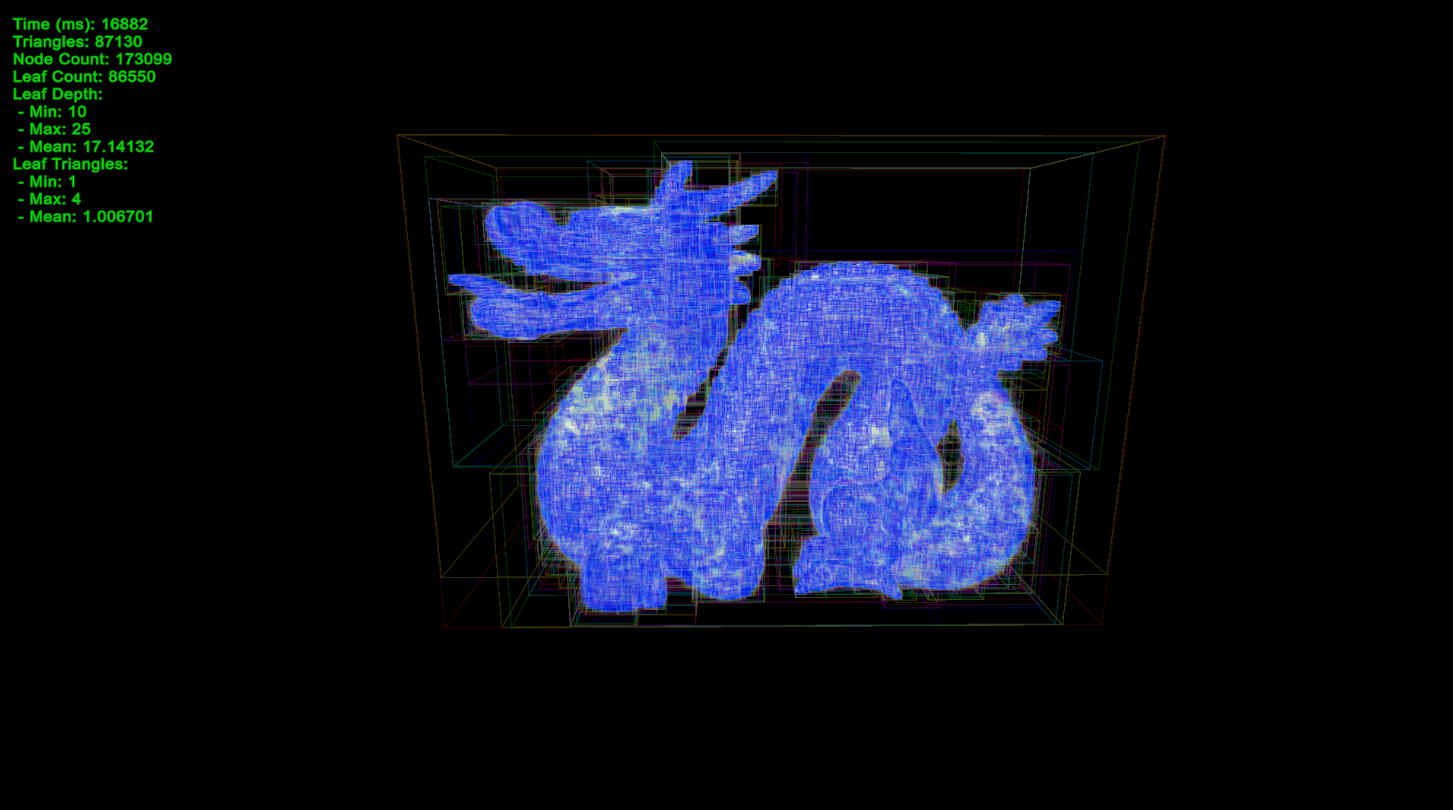
과연 삼각형들이 잘 나누어 졌을지, 트리 정보를 출력해봤습니다.

트리의 깊이의 min, max 값 차이가 크네요. 말단 노드의 포함된 삼각형 개수도 평균은 1에 가깝지만 max값이 23입니다. 제가 최대 깊이값을 설정해서 그렇지만 그렇다고 깊이를 무한히 키울 순 없겠죠. 트리가 균형잡히게 되도록 수정해봅시다.
Surface Area Heuristic
공간을 (바운딩 박스를) 어떤 축을 기준으로, 어디서 분할하는게 가장 균형잡힌 트리를 만들어 줄까요? 이것을 판단하기 위한 비용 함술 저는 SAH(surface area heuristic)를 사용했습니다. 이게 계산도 쉽고 가장 많이 쓰이는거 같습니다.
static float evaluateBoundsCost(Vector3 size, int numTriangles)
{
    float halfArea = size.x * size.y + size.x * size.z + size.y * size.z;
    float cost = halfArea * numTriangles;
    return cost == 0 ? float.MaxValue : cost;
}
박스의 표면적을 사용합니다. 비용이 0이면 빈 노드가 생겨버려서 0일땐 큰값을 반환하도록 했습니다.
float evaluateSplit(int splitAxis, float splitValue, int start, int end)
{
    Bounds boundA = new Bounds(triangles[start].vertexA, Vector3.zero);
    Bounds boundB = new Bounds(triangles[end - 1].vertexA, Vector3.zero);
    int numTrianglesInA = 0;
    int numTrianglesInB = 0;

    for (int i = start; i < end; ++i)
    {
        Triangle triangle = triangles[i];
        Vector3 triCenter = (triangle.vertexA + triangle.vertexB + triangle.vertexC) / 3f;
        if (triCenter[splitAxis] < splitValue)
        {
            encapsulate(ref boundA, triangle);
            ++numTrianglesInA;
        }
        else
        {
            encapsulate(ref boundB, triangle);
            ++numTrianglesInB;
        }
    }

    float costA = evaluateBoundsCost(boundA.size, numTrianglesInA);
    float costB = evaluateBoundsCost(boundB.size, numTrianglesInB);
    return (costA + costB);
}

(int axis, float value, float cost) sampleSplit(Node node, uint start, uint end)
{
    if (end - start <= 1) return (0, 0, float.PositiveInfinity); // no split possible

    const int NUM_SAMPLES = 5;
    int bestSplitAxis = 0;
    float bestSplitValue = 0;
    float bestCost = float.MaxValue;
    for (int axis = 0; axis < 3; ++axis)
    {
        for (int i = 0; i < NUM_SAMPLES; ++i)
        {
            float splitT = (i + 1) / (NUM_SAMPLES + 1f);
            float splitValue = Mathf.Lerp(node.boundsMin[axis], node.boundsMax[axis], splitT);
            float cost = evaluateSplit(axis, splitValue, start, end);
            if (cost < bestCost)
            {
                bestCost = cost;
                bestSplitAxis = axis;
                bestSplitValue = splitValue;
            }
        }
    }

    return (bestSplitAxis, bestSplitValue, bestCost);
}
모든 경우를 다 계산할 순 없어서, 횟수를 제한해두고 가장 나은걸 선택하도록 했습니다.
트리는 잘 구성되지만 너무 느려졌습니다... 데이터 복사나 비교 연산등을 최적화 해봤습니다.

시각화
BVH 생성은 됐습니다. 근데 이렇게 끝내긴 아쉬워서 좀 더 자세히 시각화를 해보겠습니다.
BVH가 레이트레이싱에 사용된다고 했죠? 그래서 컴퓨트셰이더에서 BVH를 순회하는 가속 레이트레이싱을 만들어 보겠습니다. 저번 레이트레이싱 일지에서 렌더링 방법은 소개했기 때문에, 오늘은 BVH 구조를 렌더링 하는데 집중하겠습니다.
HitInfo CalculateRayCollision(Ray ray)
{
    HitInfo result;
    result.dist = 9999.9;
    result.triIndex = -1;

    int stack[32];
    int stackIndex = 0;
    stack[stackIndex++] = 0;

    while (stackIndex > 0)
    {
        int nodeIndex = stack[--stackIndex];
        BVHNode node = bvhNodes[nodeIndex];

        if (node.numTriangles > 0) // is Leaf node
        {
            for (int i = 0; i < (int) node.numTriangles; i++)
            {
                Triangle tri = triangles[node.startIndex + i];
                HitInfo triHitInfo = RayTriangle(ray, tri);

                if (triHitInfo.bHit && triHitInfo.dist < result.dist)
                {
                    result = triHitInfo;
                    result.triIndex = node.startIndex + i;
                }
            }
        }
        else
        {
            int childIndexA = node.startIndex + 0;
            int childIndexB = node.startIndex + 1;
            BVHNode childA = bvhNodes[childIndexA];
            BVHNode childB = bvhNodes[childIndexB];

            float distA = RayBoundingBoxDst(ray, childA.boundsMin, childA.boundsMax);
            float distB = RayBoundingBoxDst(ray, childB.boundsMin, childB.boundsMax);

            bool isNearestA = distA <= distB;
            float distNear = isNearestA ? distA : distB;
            float distFar = isNearestA ? distB : distA;
            int childIndexNear = isNearestA ? childIndexA : childIndexB;
            int childIndexFar = isNearestA ? childIndexB : childIndexA;

            if (distFar < result.dist)
                stack[stackIndex++] = childIndexFar;
            if (distNear < result.dist)
                stack[stackIndex++] = childIndexNear;
        }
    }

    return result;
}
광선이 물체와 충돌하면 빨간색을 출력하게 해봤습니다. 잘되죠?
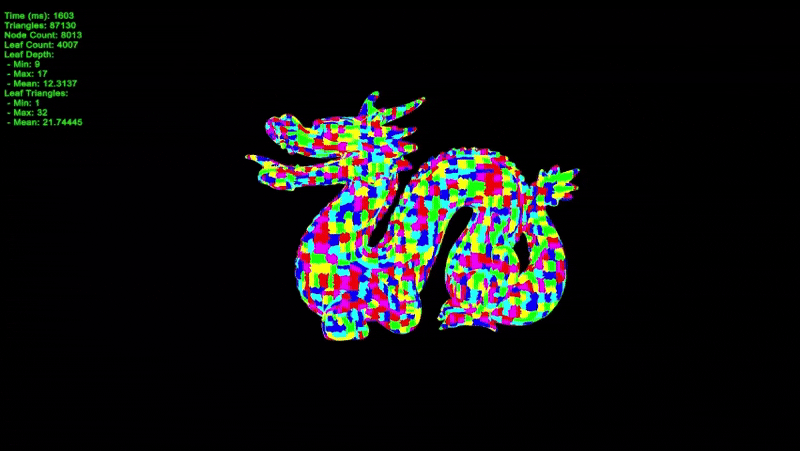
BVH 구조를 보기위해 노드마다 색을 정해서 같은 노드에 포함된 삼각형은 같은 색이 되도록 해봤습니다.
float3 nodeColor = HSVtoRGB(fmod(float(nodeIndex) / 6.0, 1.0), 1.0, 1.0);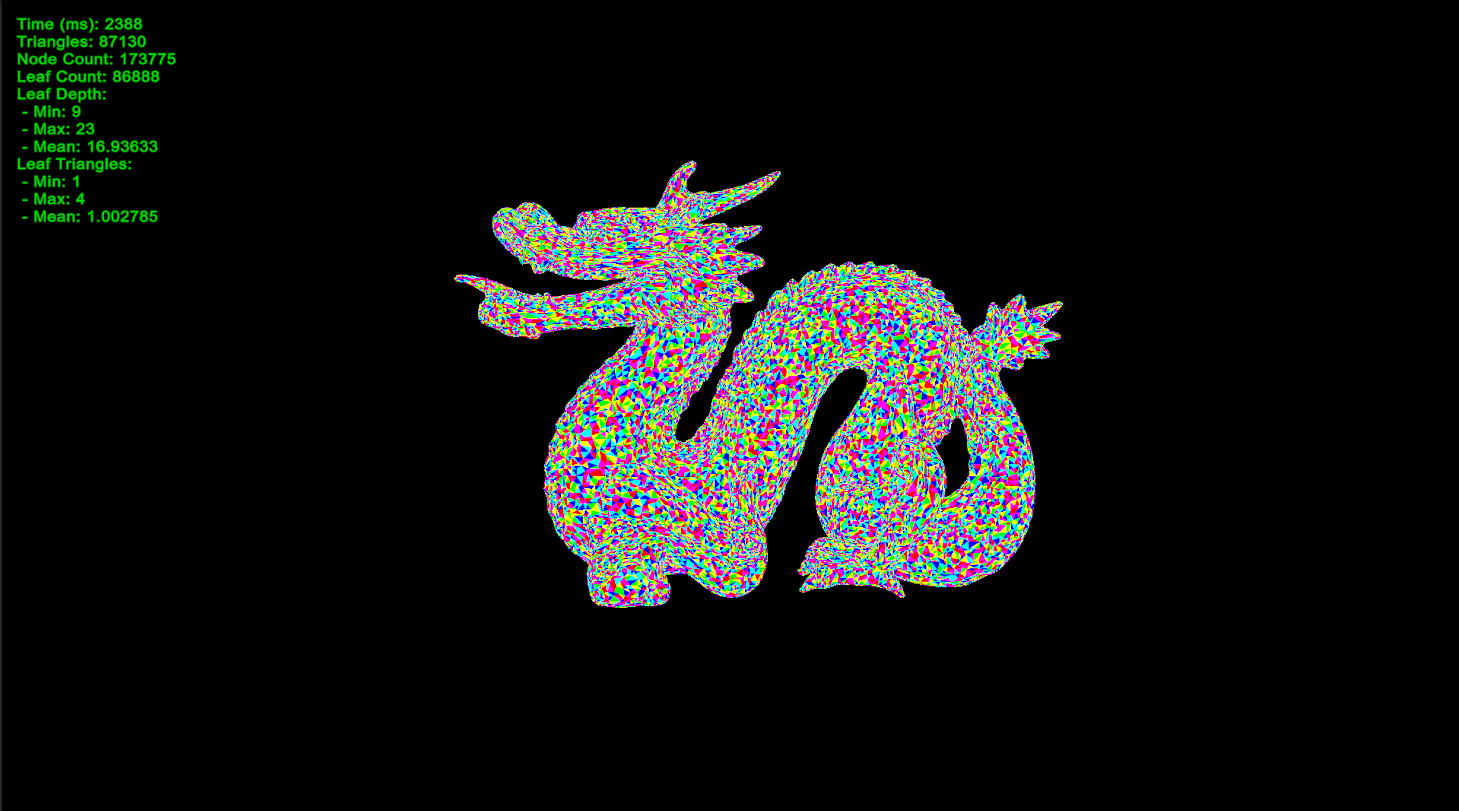
리프 노드에 포함된 삼각형 개수를 좀 늘려보겠습니다.
오늘은 BVH를 생성해봤습니다. 원래는 기본 알고리즘만 구현하려 했는데, 생각보다 재밌어서 다른 프로젝트에도 쓸 수 있을정도로 발전시켜봤습니다. 나중에 쓸 일이 있겠죠? 글이 너무 글어지는거 같아 데이터를 GPU 친화적인으로 바꾸는 부분이나, 최적화 부분 등을 소개를 못한게 좀 아쉽네요... 다음에 기회가 되면 이 부분도 자세히 다뤄보겠습니다.
감사합니다.
'🧊그래픽스 > 렌더링' 카테고리의 다른 글
| [🧊그래픽스] 나나이트(Nanite): 메쉬 클러스터링을 만들어보았다. (2) | 2025.06.15 |
|---|---|
| [🧊그래픽스] 나나이트(Nanite): 메쉬 간소화를 만들어보았다. (4) | 2025.06.14 |
| [🧊그래픽스] 레이마칭(Ray marching)을 만들어보았다. (0) | 2025.05.28 |
| [🧊그래픽스] 마칭큐브(Marching cube)를 만들어보았다. (5) | 2025.05.27 |
| [🧊그래픽스]레이트레이싱(Ray tracing)을 만들어보았다. (2) | 2025.05.26 |


